Wednesday, November 5, 2025

FTU - Cafe Day Scrapkit

I'm on a roll getting posts up today!
I have another oldie for you, all re-previewed, and uploaded.

Hope you can use and would love to see what you make too.


(Please leave some love)


Color Palettes

I was creating in psp in the wee morning hours and decided to share some color palettes with you.
You can use these for your creative muse, or as a whimsey for colors for kits or prompts for AI, blog trains, challenges in forums or what have you. I just ask that you don't redistribute them (you can include in your forum challenges) but please if you use for anything else such as supplies for tutorials, or in kits please do not include the palette... sorry they are my creation and without direct permission from me that's stealing and a no-no! Just direct your friends to my blog to get them for themselves. Thank you!


FTU Kit - Blushing Rose

I found an old portable external, and it was labeled something that I didn't need, so I was going to clean it out and found all my old designing stuff back when I was making kits and CU stuff and selling. I decided, why not rename the files, re-preview the kits, and offer them up? I updated the TOUs, but this is going to take some time.
The first one is Blushing Rose, and here it is.
Not all are previewed, and the drop shadow is on preview only!


(please leave some love)


More is to come, check back!


Monday, September 29, 2025

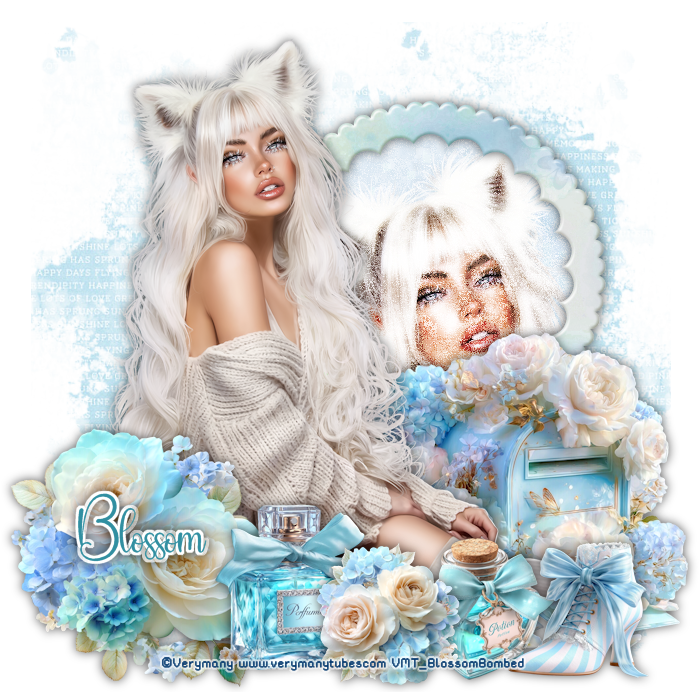
PTU Tutorial - Yuki Kitsune


This tutorial is written in PSPX9 but with working knowledge of the program, any version will work.

We will make the tag above with this tutorial
(or something similar if your using different materials)

SUPPLIES:

Tube of choice
I'm using "Yuki Kitsune" by Verymany.
You need to purchase this tube and have a license to use it.

PTU matching kit "Yuki Kitsune" by Tiny Turtle
You can purchase this kit HERE

My texture you can download HERE.

Mask "Autumn Mask 02" by Toxic Desirez

Plugins Used: Xero Porcelain and Xero Radiance

Fonts:  Rainyhearts for credits/copyright  and Boho for name

Lets begin
*REMEMBER TO SAVE YOUR WORK AS YOU GO ALONG*

This tutorial is only written as a guide to inspire. Please feel free to use your own tube, kit, and other supplies and make this your own creation.


Open tube and mask (these will be used shortly)
Create New Image 700x700 pixels, transparent
Open (4) - Copy and close
Paste as new layer on your blank image
Resize 80%
Laers - New Mask Layer- From Image
In dropdown menu choose the toxic mask
Layers - Merge - Merge Group
*You can close out the original mask image now*
Open (52) - Copy and close
Paste As New Layer
Using magic wand, click in center of frame
Selection - Modify - Expand 2
Open (8) - Copy - Close
Paste As New Layer
Selections - Invert and click Delete button
Selections - Invert
Select your tube image and copy and minimize
On your working canvas : Paste As New Layer
*I am using the full size layer of the tube I chose*
Resize 60%
Position tube in selection as desired (I chose the face and fox ears)
Selections - Invert and click your Delete button
Selections - Invert
Open my texture - Copy and close it
Paste As New Layer
Selections - Invert - Delete button
Select None
Working with your layer palette your top layer should be selected (Raster 4)
Duplicate this layer
In layer palette select Raster Layer 4 (copy of tube)

Apply Xero - Porcelain with these settings:
Softness 32  Strength 5  Red 75  Green 9  Blue 84 
Exposure 12  Contrast -26  Saturation 17

In layer palette select Raster 4 (original tube layer)

Apply Xero - Radiance using these settings:
Strangeness: 701  Charm: 32  Truth: 139  Beauty: 235

In layer palette change the propertie to Screen and opacity to 72

In layer palette close visibility on Raster 1, Group -Raster 2
Merge Visible
Open visibility on all layers again

In layer palette drag "Merged Layer below Raster 2 layer
Select Raster 2 (Should be top layer now)

Your layer palette should be labeled and look like this:
Raster 2 (frame) - Highlighted
Merged (merged plugin layers)
Group Raster 2 (mask)
Raster 1 (blank)

Add dropshadow of choice to frame
Merge Raster 2 down 1x
Position frame near top right of mask on canvas
Restore tube - Copy and close
Paste As New Layer
Resize 45%
Add dropshadow
Open (12) - Copy and close
Paste As New Layer
Resize 45%
Position right side of tube
Add drop shadow
In layer palette move this layer below tube layer and select tube layer again (top layer)
Open (61) - Copy and close
Paste As New Layer
Resize 35%
Position left bottom of canvas
Add dropshadow
Open (78) - Copy and close
Paste As New Layer
Resize 25%
Position right side of flower cluster
Add dropshadow
Open (148) - Copy and close
Paste as New Layer
Resize 20%
Position in front of tube's knees
Add drop shadow
Open (141) - Copy and close
Paste As New Layer
Resize 20%
Position right side of potion bottle
add dropshadow
Open (56) - Copy and close
Paste As New Layer
Resize 20%
Position between bottles
Add dropshadow
Merge Layers - Visible
Using mover tool slide the image up on canvas just slightly

Add copyright/credits
Merge Visible
Add name
Save as ,png

And you are done!


Friday, September 26, 2025

Lil' Monsters Vol. 1

Just off the press!
These lil' monsters are only available at Escape From Reality

They are adorable, they are the first set of many coming.
and the .png's are huge so you can use them not only for tags but for your wallpapers on your computers too! So if you are a member of EFR go check them out and if you are not then I suggest you join a friendly, fun and extremely active forum that's like family!

So introducing the 4 Lil Monsters Vol. 1


Tuesday, September 23, 2025

Saturday, September 20, 2025

Cluster Frame - Wicked Cute

Decided to do up a cluster frame to get my mojo rolling. It took a nap on me at the most inconvenient time lol. So here we are.


I used the absolutely amazing kit "Wicked Cute" by AI By TK Dezigns and you can get her kit FTU by going to her site HERE.

Just click on the cluster frame for the pop up and right click and "Save As" to your computer.


Now for the cluster frame:


I hope you enjoy!


Tuesday, September 9, 2025

Spookified And Fluffy - FTU Tutorial


We will be making this lil' cutie (or you'll be making something similar).

This tutorial is only a guide and not written in stone. It's to get your mojo going, and your creative juices flowing. Please feel free to use your imagination and create your own tags using this as a guide.


SUPPLIES:

I used PSPX9 but any version will work with basic knowledge of the program.

No outside tubes, filters/plugins or mask was used

I used the FTU kit "Sweet and Spooky by TK Dezigns


Fonts used:
For the credits: 'Pixelette' you can search for at Dafont.com
For the name on the tag: 'Chickybom' you can also search for at Dafont.com

Are you ready to begin?

New Image 700x700 Transparent
Open element 173
Copy and close
Paste As New Layer
Resize 40%
Layers - Duplicate Layer
Effects - Texture Effects - Mosaic antique
    Using these settings: Number of columns- 50 / Number of rows- 50 / Tile diffusion- 70 / Grout Width- 2 / Symetric box  checked
Layers - Arrange - Send to bottom
On canvas using the Move tool click on the monster
Effects - 3D Effects - Drop shadow of your choice (You'll use this each time throughout the tutorial)
Open element 35
Copy and close
Paste As New Layer
Resize 25%
Position left side of monster
Add drop shadow
Open element 88
Copy and close
Paste As New Layer
Resize 25%
Position right side of monster
Add drop shadow
Open element 109
Copy and close
Paste As New Layer
Position right side of books over lapping the monster
Layers - Duplicate
Layers - Mirror - Horizontal (you may have to position the tube yourself if your using an older version so it's left side of the cupcakes overlapping the monster).
Open element 190
Copy and close
Paste As New Layer
Resize 20%
Position center of flowers
Add drop shadow
Open element 58
Copy and close
Paste As New Layer
Resize 20%
Position left side of flower
Layers - Duplicate
Add drop shadow
Layers - Mirror - Horizontal (or position yourself so it's right side of the flower overlapping the books).
Open wordart 9
Copy and close
Paste As New Layer
Resize 35%
Position above monster so it barely overlaps the tips of the horns
Add drop shadow
Add credits
Layers - Merge - Merge Visible
Add name
Save as .png

And Vwallah! Your done!!


Friday, September 5, 2025

"Autumn In Fairyland" - EFR Blog Challenge Tutorial

 This tutorial is a Blog Challenge for the Month of September at Escape From Reality.

I hope you enjoy it!


This tutorial is only a guide and not written in stone. It's to get your mojo going, and your creative juices flowing. Please feel free to use your imagination and create your own tags using this as a guide.


SUPPLIES:

I used PSPX9 but any version will work with basic knowledge of the program.

No outside tubes, filters/plugins or mask was used

I used the FTU kit "Autumn In Fairyland by LMS


I used an element tube from the kit but you may use a tube of your choice.

Font I used was PUMPKIN GIANT and you can get it at DaFont


Are you ready?

New Canvas 700x700 pixels

Open frame 1 - Copy & Close

Paste As New Layer

Resize 60%

Open element 2 - Copy & Close

Paste As New Layer

Resize 40%

Position left side center on frame

Add drop shadow of choice

Duplicate layer

Position bottom center on frame

Open element 9 - Copy & Close

Paste As New Layer

Resize 60%

Position bottom left between flowers

Add drop Shadow of choice

Open element 33 - Copy & Close

Paste As New Layer

Resize 45%

Position between pumpkin and flower

Add drop shadow of choice

In layer palette select Raster 2 (Frame layer)

On canvas use Magic Wand and select inside frame

Selections - New Raster Layer

Open paper 6 - Copy & Close

Paste Into Selection

Select None

In layer palette drag this layer below the frame layer then select the frame layer again.

Open element 90 (or tube of your choice - Copy & Close

Paste As New Layer

Resize 60%

**If using your own tube you'll need to resize to your liking

Position as desired and add a drop shadow of choice

In layer palette select frame layer again (Raster 2)

Add drop shadow of choice

Open element 86 - Copy & Close

Paste As New Layer

Resize 50% and position as desired (I positioned slightly up and left)

Add proper credits and merge layers visible

Add name

Save as .png

Yay your done!


Wednesday, September 3, 2025

Hot Cappuccino Snags

 Had some fun in PSP tagging my Always List and decided to tag up some snags for a few of the posts at EFR. Click on them to get the full size and then right click and "Save As" to your computer.


Yes you can add your name to them if you desire.


FTU - Cafe Day Scrapkit

I'm on a roll getting posts up today! I have another oldie for you, all re-previewed, and uploaded. Hope you can use and would love to s...